Wednesday, 5 November 2014

Squash and Stretch

Squash And Stretch (Animation)


12 Old Men

  • Anticipation
The action of anticipating something; expectation or prediction.
To predict and To expect.
  • Staging
Staging is the presentation of an idea so that it is clear. This idea can be an action, a personality, an expression, or a mood. The key idea is that the idea is made clear to the viewer.
  • Follow through and overlapping action
Follow through and overlapping action is a general heading for two closely related techniques which help to render movement more realistically, and help give the impression that characters follow the laws of physics, including  the principle of inertia.
  • Arcs 
Most natural action tends to follow an arched trajectory, and animation should adhere to this principle by following implied "arcs" for greater realism. This can apply to a limb moving by rotating a joint, or a thrown object moving along a parabolic trajectory. The exception is mechanical movement, which typically moves in straight lines.
  • Slow-in and Slow-out
The movement of the human body, and most other objects, needs time to accelerate and slow. For this reason, animation looks more realistic if it has more drawings near the beginning and end of an action, emphasizing the extreme poses, and fewer in the middle. This principle goes for characters moving between two extreme poses, such as sitting down and standing up, but also for inanimate, moving objects, like the bouncing ball in the above illustration.
  • Secondary action 
Adding secondary actions to the main action gives a scene more life, and can help to support the main action. A person walking can simultaneously swing his arms or keep them in his pockets, he can speak or whistle, or he can express emotions through facial expressions. 
  • Timing
Timing refers to the number of drawings or frames for a given action, which translates to the speed of the action on film. On a purely physical level, correct timing makes objects appear to obey the laws of physics; for instance, an object's weight determines how it reacts to an impetus, like a push. Timing critical for establishing a character's mood, emotion, and reaction. It can also be a device to communicate aspects of a character's personality.
  • Exaggeration
Exaggeration is an effect especially useful for animation, as perfect imitation of reality can look static and dull in cartoons. The level of exaggeration depends on whether one seeks realism or a particular style, like a caricature or the style of an artist. The classical definition of exaggeration, employed by Disney, was to remain true to reality, just presenting it in a wilder, more extreme form.
  • Solid Drawing
The principle of solid drawing means taking into account forms in three-dimensional space, giving them volume and weight. The animator needs to be skilled draughtsman and has to understand the basics of three-dimensional shapes, anatomy, weight, balance, light and shadow, etc.
  • Appeal
Appeal in a cartoon corresponds to what would be called charisma in an actor. A character who is appealing is not necessarily sympathetic - villains or monsters can also be appealing - the important thing is that the viewer feels the character is real and interesting.
  • Squash and Stretch
The most important principle is "squash and stretch", the purpose of which is to give a sense of weight and flexibility to drawn objects. It can be applied to simple objects, like a bouncing ball, or more complex constructions, like the musculature of a human face.

http://www.youtube.com/watch?v=LoR2k3B0ifk - This video was made by (DarkmaneTheWerewolf)

This image shows you a tutorial that I have used, that has also inspired me to create my own squash and stretch or bouncing ball motion. This helped me a lot because I was able to understand how everything worked and how I could make certain movements, go faster or slower, this created a type of motion that made the ball go from big to small.
This image shows you an image of my animation of (squash & stretch) the bouncing ball goes from big to small from wherever position its going to land or bounce back from, this creates a squash and stretch motion.


This image was used for help because I needed some guidance where the ball would bounce and fall or stretch from, this helped a lot because it let me know how my work or my own animated ball would look by it self without the guides and it made me understand how most animators create their moving images. Timing helps out a lot and so does spacing because doing these two things you are able to understand how fast you can make the ball by spacing it out or how slow you can make by bring it close together both of these things create the movement of the ball and also squashing the ball when it hits the ground makes the squash and stretch motion also.  


This image shows you my folders or frames plus boxes that I have named so that there was nothing mistaken or taken off while working on this. This helped me know everything and also helped me understand what or where I should take my every step.


These two images are from an idea I had but wasn't able to finish, it was going to be a character shooting a basketball in a loop, if only I finished it fast enough it would of probably looked great.


Jeferson Da Gloria (Stage of Pre Production)

Exercise 1

Stage of Pre Production


  • Story Development/Brainstorming
Story development goes into a range of things because story development is where you get started and how you started off is the main thing because you have to have a clue or an idea of what you want to do for a story and how you would like your audience to react to the way your story gives them different types of emotions and feelings. Also when making a story, everything has to be in sync so that the viewer gets what is happening because if thats not the case, then the viewer wouldn't understand where the story is heading and would be confused on what your trying to tell here. So whenever making a story always make sure, even if the story goes into a new day to always have a little remembrance of the day before today.


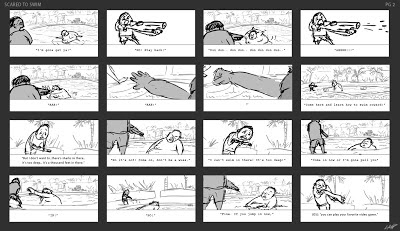
 https://blogger.googleusercontent.com/img/b/R29vZ2xl/AVvXsEgA8o2x00mHH4YEOz8PJynfXn3o_HLIx9OZMfVhabjawcnhYNLD1nF1uTEAMVyb7iLnN7lfde3OPnp_FEOa1JVYbJb_CtzGCsVdmhVwa1551RbgrdBf5OvGLL-ZtsONbihuEkoeqWnCF4bI/s1600/ScaredtoSwim_3rdpass_2.jpg
Brainstorming is when you get a range of ideas and use these to create a final piece of work or many different pieces of work to go into your final project, this helps a lot because you need ideas to bring a story or a character to life and these ideas can generate anything because your ideas are just ideas but when you start drawing the characters and you think of what they should wear and how they should look then, you will be wanting to create a story for them out of the ideas you had, all these things will help you create a better story for your character. 
http://www.jumpassociates.com/wp-content/uploads/2011/07/Oren-Jacob-Visual-Recording-Altered-Small1.jpg 
This image shows you the type of brainstorming you would be doing in your own time and how it would look, but brainstorming can used for a range of things because its not just for animation, if you need some ideas for anything then brainstorming can help you out with anything, like if you are having a discussion and everyone has their own ideas, brainstorming can help anyone out.
  • Script
Script includes, titles, headers, subtitles, character names, dialogue, all these things are important in a script because these all help the story come to life and also helps the audience understand what's going on and know what is happening. Scripts help the creator a lot because it helps this person know where he would put his character and how he would create every individual scene in the story so that different pages could be special and unique to each other, every scene to have their own theme and excitement in them, also not everything has to be the same as the script but some bits can be modified, so that the audience can be surprised about the story and want to know where its
heading. Everything goes into the script and guides everyone involved. http://www.ollysmith.com/wp-content/uploads/2010/07/Pingu21.jpg 
This image symbolises what I have explained above. All the characters names must be written down so the audience knows who is talking and also there must be certain parts where the story is being explained and the viewer is getting told what is happening in that certain day or moment in time.
  • Style
Styles can vary from different things like the type of style you use to draw different items or objects, the way you create your character and how you work on improving that certain character, because styles if way of life as you may you say, because by using different styles you can understand how you can change your characters appearance or how he could look and so on. Moodboards are created to portray the overall style that the art director wants to create. (See below).
  • Character development/Model sheets
https://blogger.googleusercontent.com/img/b/R29vZ2xl/AVvXsEg-jdOCyvCIya2RRThTbgr9LQHPfNkqB6DA23riNmUeVLm0wN6RPvZnnzuBjbwgBQcxK79Qvpb5ESekZpsDVRHUjp3ZsoIuKmjjBSDn481sIzMjWGHshV5pa0deD-j1PrfbV2AjBBOzNA/s1600/Blog-Gamer-6-28.jpg
Character development is when you get your ideas and make them into one character or a range of characters and also have to create a range of emotions and poses for your character that you think you would like to use for your story and also different scenes where your character could be doing something, for example; smiling at a mirror etc. All this can help the story become better and greater by making different emotions in different scenes and activities that the character is doing like playing a certain game or playing a certain sport, which could be used in the story that you have put out for your own character. Model sheets helps you understand what you would like your character to look like and what type of stance he/she would have in the story, this also lets you find out what type of outfits you would like for he/she to wear in every or certain scenes & Expression sheets this lets you know what type of expression your character would use for any scene their in, for example if its tense they would use an expression or a funny scene another expression.


  • Environments/Background/MoodBoard
http://www.start2.co.uk/files/courses/STRESS_BUSTING/improve_your_mood/recipe_collage/4_step_4_moodboard_2.jpg ; http://tomhinesanimation.files.wordpress.com/2011/04/mood-boards1.jpg  
These images were used to symbolise what I have explained about mood boards and backgrounds/environments, they also show different feelings in both, like the first one symbolise happiness and calming because it tells you this and the second image shows earthly colors to put into more simple words, the colors; Green, Blue, Yellow and Black. Creating a mood board makes you think of creating a background just like this for some scene and different type of mood board for another scene.
Environments are very important because your character needs an environment where he could be either a hero/villain or civilian, backgrounds and environments can be anything as long as they go with your character and s  tory because if they don't, the audience will notice a difference in the story and sometimes change isn't always a good thing. A Mood board is basically all the colors you would like to apply to your story and to your characters clothe-wear, which helps because you don't want your character to look plain, you do want him to stand out and not look the same as everything else in the scene or story.
  • Story Board
http://i3.photobucket.com/albums/y89/Bandanna_boy_17/Animation%20Source%20Articles/sequence-1.jp 
Storyboard is when you apply a certain idea to paper and create different windows for what you think is appropriate for a page or scene, this helps a lot because when it comes to creating the story the animators are not confused about what you want to do first, but already know what you want to happen in those scenes and sure of what you should do for every part of the story. Storyboards are used to help the client or studio manager know what is happening and what will happen next by adding little notes to the side letting the client/manager know what this certain scene or part of the story is and also the scenes have to be in a flow because if they are just zigzagging then no one would really understand what their supposed to understand. Helps if you work in a team, cause everyone can know what the plan or idea is and can also add to it if required. 

  • Anamitc & Sound & SFX

Sound and effects include a range of things from background sounds, dialogue and special sound effects, these all help make the animation look and sound great, because sound is needed for when you want to have some interesting sounds in your animation and this also helps make your work great in every-way, instead of it being muted and dull. The use of sounds creates an environment to your work and also can create different types of emotions.  
  •  Production Schedule
http://blogs.tees.ac.uk/teamzest/files/2013/11/ProductionSchedule.jpg
Production Schedule is so you know when and where you will be finishing off your current work and how you will be creating the project in those certain days. It includes different dates and times and different subjects that you will be doing in your own time or the time in your workplace, this helps you a lot because it lets you know what you have to do that certain day and what you haven't done on that other day. It makes life much easier if you do have one of these production schedule, but it does have to have your own information and not just information from another person that you have copyrighted.


Frame By Frame

Frame By Frame Animation

What I did was created my own face animation and added an emotion to it and looped it, to create a motion which included fames and more frames. This helped me get better at creating faces without using a drawing board or flash board and I also learned how to make different types of actions with flash.

This image shows you my final piece of work and how it looked after I finished working on it, it went from being a normal looking face to a funny looking character with an amazing story if you wanted to give him a story, this also helped me because this way I was able to create different types of stories for what his action could go into.


This image shows us the viewer what type of setting you would be using for your scenes so that you know where everything would and would be staged at and not forget how everything works or if the work your trying to produce isn't to big for the stage and this helps a lot, because it can keep you from making mistakes.


This image shows you my time line where you can see that there is a lot happening and it would be hard to explain, but no my time line shows you different frames and tables of where all my objects are so that I don't get confused on what I am doing and also so I don't delete something or a whole table and not be able to get it back because of it.

This video or image is by a YouTuber named - Tutorials101 Videos.

He shows the viewer how to create a frame by frame animation by using onion skin and also using different layers to get different aspects into the work it self. This helps the viewer understand how they would be able to create their own frame by frame animation and have no trouble with making it from scratch, or with a little guidance.


Wednesday, 15 October 2014

Walk Cycle


Walk Sequence or Cycle

In this blog I have been asked to create a walking sequence/cycle, which came out great. We were shown some great examples by our tutor which I will be talking about.


This image was brought from (Google) where I used to create my walking sequence, I was really inspired by this image that I wanted to create my own just like this. https://blogger.googleusercontent.com/img/b/R29vZ2xl/AVvXsEhzB8Mrw5sM48nOXu31CAix8-w_UXCe9N11gehuC3RfvqP1dtWszcbI_ghfV9ejxxQjb5BiWQSUill12zFnvLr-TX3nNxjogeojn3Uuu-_GxB4Lkp1DDLkbI_xwm6abSorldou8SHYonpEi/s1600/angry+animatorwalk.jpg  This image will appear only if you type (walk cycle animation) and their you'll the same type of picture of different varieties of those.

In this image it shows you a tutorial that I have used for own work the owners name (Draw with Jazza) which the videos name is right above and he shows us or the viewers how to create a frame by frame walk cycle by using onion skin.

To be able to create the walk sequence you would have to use the (brush tool) or (pencil tool) if you wanted, this helps you draw over your pictures that you would like use also this always helps when you need create something that you don't want to trace over.


This image shows flash where you would have to open and get to (ActionScript 3.0) doing so, would mean that you would be able to create you background or layer you would be able to see your images from, this helps out a lot because that way your images won't be off screen.


This shows you the layers and because of that you would have to create names for every layer so that you would not get confused in what your certain object is in and also so you don't delete something by accident only realizing that it was something you needed to keep on screen. Therefore having names on layers can really help out.


This image shows you my finished animation and how it looked, unfortunately I am not able to make it move in my blog, my collages are able to but you will find my videos on my (USB) where you would understand where I was going with this image. Therefore it is a walk cycle that has it self stretched and also looped.


This shows an image of the walk sequence I am going to use also to have the walk sequence to work on your flash file, you would have to import to (Library) so that nothing gets lost or doesn't work when you try to use it at another date in time. 


This image shows you that you would need to use these types of settings on your (Flash File) so that the screen is able to fit everything you are trying to create and also that nothing is too big, this really helps a lot.


I am able understand and am able to create my own characters or facial emotions easily without struggle and understand how all keys work.
I am able to create my own walk sequence because I've done it many times and also understand how the image or objects should react to the scenery, also I know that the layers need to have names on them and also that they sometimes might need to be locked or you might to click on the eye button so that some images can't be tangled with or can't be scene when you are trying to work on another image or object.


Thursday, 9 October 2014

Face Emotions


While drawing face emotions and dynamic emotions I was able to understand and know how to use flash for the future, which I did not find too tricky.

 To start off you would need to open up a new file called (ActionScript3.0) which lets you have a clean sheet to start off with your drawings, you then go to page settings so that you can change your stage to your right size that you want it in, for example; (768-576 or 800-600) these help you get the right idea where everything would fit and where everything else wouldn't.


 This image shows you the final piece of my work which I did put time and effort into and it does look pretty good. I had to learn how to create the border lines and the insides and also the lines for where everything would go, for example: Teeth, Nose, Eyes. All these can vary from whatever you are trying to make.


This image show you the (Paint Bucket, Pencil & Brush) these tools help you out a lot and also the (Eraser) which I forgot to include. These are initial because they help out a lot. Let you draw where ever you want and paint over what you draw like paper, which is really cool. The pencil tool is just like a pencil you can go from (smooth-scruffy) whatever suits you, The brush tool helps get those beautiful lines you were looking for, when the pencil tool don't help you out and The paint bucket helps out when you wanna paint over something because you don't wanna erase it by accident or don't want to forget where your positioning it.

This was a little drawing I did that I was also going to used to make an expression out of it, which would of made it look either humorous or upset or angry, which would of been fun to but I was really struggling with the (Bucket Hat), at the end I got really face drawing plus beard which made me feel good about it.

This image shows you a image of my table that I created and that I have used for my Face Emotions animation which helped me know where everything was and is, so that I didn't delete anything by accident and had to start again, which could really mess you up.


 https://www.youtube.com/watch?v=qAKqt4kxMBE&list=UUHu2KNu6TtJ0p4hpSW7Yv7Q
 This link leads to the (YouTube video created by Draw with Jazza) Which is about creating dynamic faces from just being normal smileys or angry faces. This has inspired me because I love cartoons and drawing these faces would really help.

This link leads to the (YouTube video also created by Draw with Jazza) Which helps you identify where all the features should be and how you should draw your borders so that you make mistakes while trying to create a head.